This documentation is for version 4.x. For the latest documentation, click here
Editing a Checklist in Agile Boards
- Yves Riel
- Maxime Lefebvre
- sidharth sharma (Unlicensed)
You can edit checklists in Agile boards via a specific panel on the right side of the screen. Every change that you make to the Checklist is immediately committed. You do not need to click any Submit button to commit your changes. Hence, it is recommended that you exercise caution before changing or deleting an item as such changes cannot be undone.
When multiple checklists are applicable to an issue, you can control their order and/or visibility via their field config and their order on the issue screen.
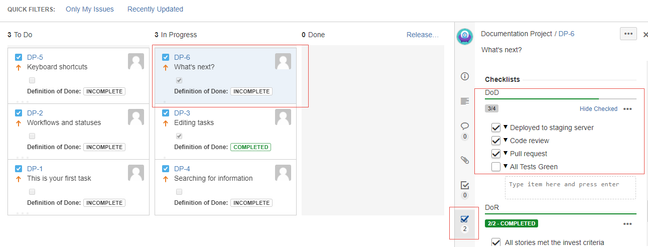
The number below the Checklists Panel icon indicates the number of Checklists displayed in the panel. If more than one Checklist is available to the selected issue, each Checklist is displayed on top of each other with their name in the header. If no Checklist is available, the panel is removed from the details view.
The entire Checklist is saved when an item is changed. Custom fields work in a last saves win scenario, implying that if two users simultaneously try to save a custom field, the user who saves the changes later will overwrite the changes made by the previous user. Hence, if multiple users work on the same issue and the same Checklist, there is a possibility of conflict. However, this is an unlikely event as JIRA periodically refreshes the board and forces a full refresh of the issue when the browser receives the focus.
This feature can be disabled. Go to Administration → Manage Apps, unfold Checklist for Jira app then click the link to see enabled modules and disable the module named Agile Details View by clicking the button to its right.