This documentation is for version 4.x. For the latest documentation, click here
Displaying Checklist Status on Agile Cards
You can display a Checklist on the JIRA Agile cards by using another custom field that acts as a proxy to the real Checklist. When you install Checklist, two custom field types are added to your installation:
- Checklist
- Checklist Read-Only Proxy
The proxy is read-only, reads the Checklist data and displays progress information based on the Checklist's status. You can even customize the proxy to display your own specific text.
To display Checklist status on JIRA Agile cards, ensure that you have administrator rights in JIRA and that you can access the administrative menus.
To display Checklist status on JIRA Agile cards, perform the following steps:
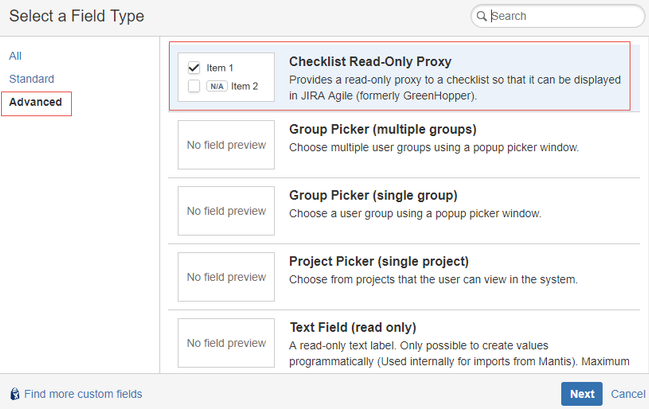
- Create a custom field of the type: Checklist Read-Only Proxy (can be found under the Advanced tab).
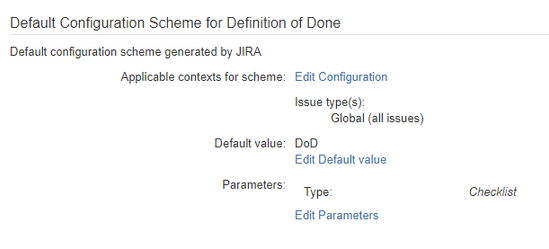
Access the custom field and click Configure.
Default Value Select the Checklist that needs to be displayed in on the card. Parameters The parameters menu is only available for Checklist version 4 and above.
Customize how the Checklist should behave and be displayed. Possible parameters are:
Type Allows you to configure the visual style of the Checklist Read-Only Proxy. Possible values are:
- Checklist. If you want to display the entire Checklist with all of its items but in a read-only manner.
- Banner. If you want to display an overall status of the Checklist.
You can use this custom field as a read-only version of the Checklist or as a banner.
Only the Banner type has been engineered to be displayed on an agile card. The checklist type should not be used on the card as Jira limits the vertical height of the field thus preventing its full display on the card.
Banner prefix Allows you to define the prefix for the banner. Possible values are:
- None. If you do not want to specify a prefix for the banner.
- Custom field name. If you want to use the custom field name as the prefix for the banner.
- Custom. If you want to use a custom prefix for the banner.
This option is enabled only if you select Type as Banner.
Banner type Allows you to specify the type of the banner. Possible values are:
- Progression. To display the same text as in the Checklist header.
- Custom. To create your own personalized Checklist status.
- Completed. To display the personalized Checklist status when the entire Checklist is completed.
- All mandatory. To display the personalized Checklist status when all the mandatory items are completed.
- Incomplete. To display the personalized Checklist status when the Checklist is partially completed.
- Empty. To display the personalized Checklist status when the Checklist as no items.
While creating your own custom banner, you can use %variables% that provide more information about the Checklist completion. For example:
DoD %PercentCompleted%% Completed
results in the string "DoD 100% Completed" if the entire Checklist is completed.
Available variables are:
- %CompletedItems%
- %IncompleteItems%
- %TotalItems%
- %PercentCompleted%
- %PercentIncomplete%
- %CompletedMandatoryItems%
- %IncompleteMandatoryItems%
- %TotalMandatoryItems%
- %PercentMandatoryCompleted%
- %PercentMandatoryIncomplete%
- %CompletedGlobalItems%
- %IncompleteGlobalItems%
- %TotalGlobalItems%
- %PercentGlobalCompleted%
- %PercentGlobalIncomplete%
The Banner type option is enabled only if you select Type as Banner.
Banner appearance Allows you to define the appearance for the banner. Possible values are:
- Subtle
- Normal
This option is enabled only if you select Type as Banner.
- Go to Board > Configure > Card layout and select the fields that you want to be displayed in the JIRA Agile card.
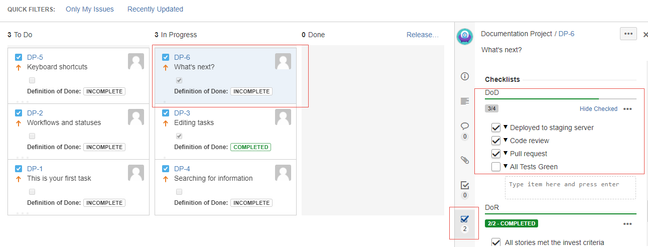
Access the Kanban/SCRUM board and click an issue. The system displays the banner on the card according to how it was configured.


