Configuring a Checklist
- Yves Riel
- Kirill Menshov (Unlicensed)
- sidharth sharma (Unlicensed)
A Checklist can be adapted to your needs and preferences through the Checklist Definition.
To configure a Checklist, ensure that you have administrator rights in JIRA and that you can access the administrative menus.
To configure a Checklist, perform the following steps:
- Navigate to Settings > Add-ons > Checklist Definitions.
- Go to the Preferences section.
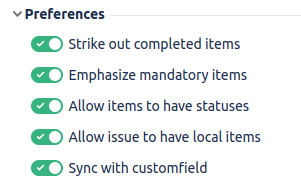
Enable or disable the available preference check boxes. For more information on the available options, refer to the following table:
Strike out completed items Applies a strikethrough effect on the text of the checked items.

Emphasize mandatory items Displays an asterisk (*) at the end of the mandatory items for easy identification.

Allow items to have statuses Allows you to to add statuses to items. If you disable this preference, the system disables the status drop-down menu so that a status cannot be assigned. If an item had status, the system preserves such values but are not shown to the user. If this preference is enabled at a later time, the status reappears. Allow issue to have local items Allows you to add local items directly to the issue. Global items are shown and it is possible to add statuses and select/clear such items. Sync with custom field Allows you to create a new custom field in your JIRA instance. The system syncs the status of the Checklist with the custom field. This custom field can then be used to prevent a workflow transition or to simply display the Checklist's status in an Agile Board's card.
May slow down Checklist updates
As Checklist must synchronise the status with your host application for each operation, it may take a little bit longer to update a Checklist when this preference is enabled.
Related content
© 2018 Okapya Software Solutions Inc